A Faster way to Tie by Rissa
There are two things to get a bracelet finished earlier:
- knot more often
- knot faster.
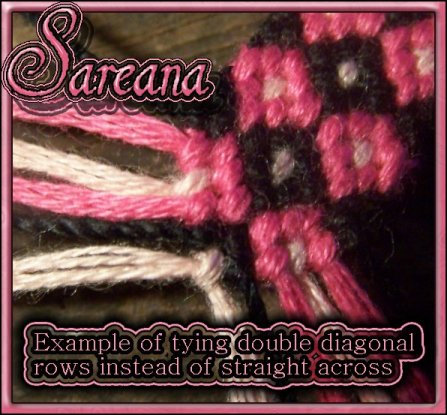
For knotting faster it helps if you don't do one knot, put both strings away and pick up the next two strings to make the next knot in the horizontal row, but if you knot by section (diagonally). More often than not you only have to search for the one next string that way, not two, and it's easier to memorize the pattern if you don't see it as single knots but a structure of single pieces which interlock.
And if you memorize the pattern after a short time you don't have to look at your pattern sheet that often which saves some time, a look at your already finished part of the bracelet might be enough, and even if you still have to look at the sheet it helps to find the right place to look at if you remember that you just did five fk with green at the right side of the bracelet - five green knots should be easy to locate.
Knotting by section needs some practice though. If you are one of the knotters who go by horizontal row it might be even slower in the beginning. But trust me, it's really faster.
I usually do a twelve string bracelet in way less than 2 hours, I made five wide Celtic style bracelets with 32-50 strings in about a week. But if I am forced to go by horizontal row (with tartan patterns for example) I need a lot more time.
One of the easier patterns to start would be pattern #118
as it is only a little more than a basic candystripe pattern.
First we have a look at it to analyze how it works.
With the white strings you can make fk from top to bottom (red lines). And the pattern isn't just 12 rows long, if you look at the preview on top you can see that the white lines go all the way from top left to bottom right.
So we want to make sure that you really can do as much of these knots, one after another.
The colors also go from left to right, but there's a single white bk every few rows. This means we can't just take the colors and make a stripe all the way down, but have to take care where the "white dots" have to be.
A lot of people (most I know at least) have learned to make candystripes by taking the outer left string and making fk to the outer right, then grab the new outer left string to make fk to the far right. This will produce a diagonal beginning, not a horizontal one, so the "triangle" that's missing in the top right has to be filled first. And this is what we are going to do now.
So when we want to knot that pattern section by section I'd start at A, make the first blue FK, then do the white "stripe" B (3FK), then C1 (two light blue FK), C2 (the white "dot"), C3 (another two light blue FK) and so on. This "triangle" you knot from right to left will be the base for any further "stripes" you want to knot.

When you do that you have to remember one thing again: the pattern is not just 12 rows long. Your bracelet will most likely be around 120 rows in the end (that's how long mine are at least). So it would be stupid to stop this after 12 rows like shown in the pattern picture.
This picture shows some more rows with complete "stripes" from top left to bottom right.
There's also a clear scheme visible where the white "dots" have to be: after five colored knots there's one white dot. The orange "stripe" starts with a white "dot", then there are five orange knots, another dot, five orange knots and so on. And the dots are all in one horizontal row which is easy to remember.
It will really save a lot of time knotting the pattern this way as you can do up to 15 knots in a row without putting the string aside, you only have to search for the second string, but that's easy to pick.
So that has been a basic pattern to show, without really any interlocking. The next one will be only a little more complicated.
Next one is pattern #1661.

It only has 8 strings, in sections which are interlocking:
You need to finish one section or one part first before you can do the next.
but repeated some more times to make it more visible what we now want to look at.
The pattern is made out of several basic "pieces",
small diamonds -
big diamonds-
side triangles -
chevrons-
Chevrons and big diamonds can also be seen as a "fish" filled with a small diamond.
This image shows the sections and the order in which they have to be knotted:
You have to start with section 0, it's just the rest of a big diamond, but this one's one important to remember.
After 0 you start with the "real" pattern, the chevron or "fishtail" (A). You'd have to start with A1 as you won't be able to make the first knot of A2 otherwise. After finishing this chevron you have the base to do both side triangles B1 and B2. And once you've finished these you can do the beginning of the big diamond C1 and C2. Knot the small diamond D after that, then finish the big diamond with E1 and E2. Then you can start with A again.
But that's not the only way to knot this, there's also a different order you can do.
Look here:
You can see that in this case first the right side is done, then there are seven knots C made from one side of the bracelet to the other.
Editors
The original author of this tutorial is Sareana .
Uploaded photos (see all 1)
Moderator comments Show comments