Embellished Bracelet Using Rhinestone Chain/Broken Jewelry
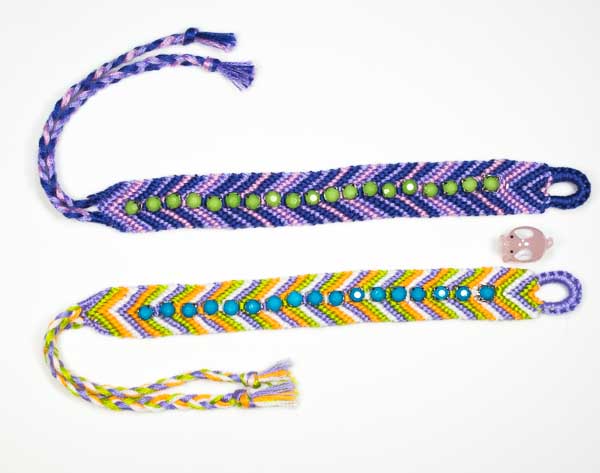
I only started making friendship bracelets recently and I really wanted to add a little something "extra" to my bracelets, when I searched for embellished bracelets I got a bunch of great ideas but the only tutorial I found said to glue chains/rhinestone chains to the top of your bracelet and stitch in-between the "gaps" of the stones or to secure a chain in place and I just don't like how that looks so I tried something new.I decided to go with a really simple pattern because I didn't want to make things super-complicated. I went with a basic rag-rug pattern (which I have linked below) using a bunch of cool-colors. I'm sure you can do whatever pattern you'd like with as many strings as you'd like, possibly even multiple chains, but I wanted things to be simple at first =) I chose to go with 16 strings so it wouldn't be too wide or too narrow so I can still see the pattern but not take too much away from the "sparkle".
Start and end your bracelet however you'd like.
I ordered my 16 strings (8 colors, two strings of each color) randomly to keep things interesting, so I came up with:
Navy Blue, Dark Blue, Lime Green, Purple, White, Light Blue, Medium Blue, Dark Green, White, Lime Green, Medium Blue, Dark Green, Navy Blue, Light Blue, Purple, Navy Blue.
Then I did forward-knots all the way across
(picture coming soon)
I followed that with a row of backwards-knots, then another row of forwards-knots continuing the pattern before adding my chain. I used a broken rhinestone chain I had from some cheap jewelry that I wasn't going to be able to use for anything else, one end had a hole to make it easy to thread it onto my bracelet to start but if you can't find something like it you can use a safety pin to hold the first stone in place and continue after this step. I wanted my rhinestones to be centered so I laced them on my two middle strings (dark green and white).
(picture coming soon)
I simply continued the backwards-knots to lock the chain in place, then forwards-knots, then with the next row of backwards knots I made sure the knot went OVER the chain so there was a knot on top concealing the start of the chain.
(picture coming soon)
I continued the basic forwards/backwards rag rug pattern making sure that if a stone was going to show on top, the knots were tied BEHIND the chain...
(picture coming soon)
...then when it came to the backwards knot that would be just below the stone I made sure it was in FRONT of the chain to lock the stone in place just like I did before to hide the start so it would hide the gaps between the stones.
I simply continued the pattern until I got to the end which didn't have the same loop that the beginning of my chain did, so I just kept going with my pattern locking the last stone in place making sure to knot behind with the backwards-knots, using the forwards-knots to lock in the sides. Once the rows started showing past my stones, I did an additional 3 rows then ended my bracelet but you can make yours as long/short as you want.
(picture coming soon)
I ended mine by making two braids on each end and doing a few square knots over them so I can easily wear and remove my bracelet.
Editors
The original author of this tutorial is ClaireBearx3 but it was also edited by Kestrel and k_marie.
Uploaded photos (see all 6)


Comments