Alphabet / Letter patterns
| Table of contents |
|---|
| 1 - Introduction 2 - Knots used 3 - Tying the pattern 3.0 - Step 1 3.1 - Step 2 3.2 - Step 3 3.3 - Step 4 3.4 - Step 5 3.5 - Step 6 3 - Example alphabet letters |
Introduction
This tutorial should teach you how to make the two-colored alpha patterns (also called Letter-, alphabeth- or cross-stitch patterns). The video below shows you how to do it while the rest of the tutorial tries to explain it. This tutorial will not teach how to make the Multicolored Alpha patterns, they are explained in the tutorial Multicolor Alpha Bracelets
Knots used
The only knot you will need to make this kind of pattern is the double half-hitch knot:
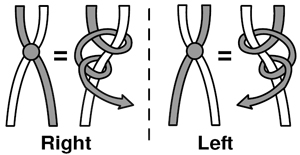
It is recommended that you practice on doing this kind of knot before starting on a full bracelet. Got it? Let's start!
Tying the pattern
Step 1
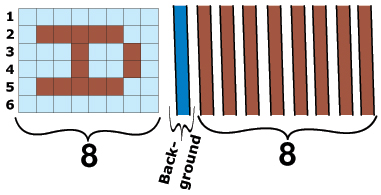
You'll need as many threads as the patterns witdh (eight if you choose one of my suggested letters), plus one in the background color.
Step 2
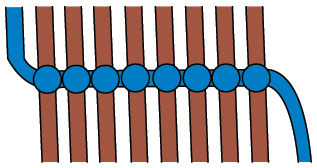
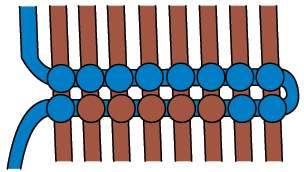
Start with the blue thread to the left and make right-hand knots. This will be the first row of the pattern in the letter A (see step 1).
Step 3
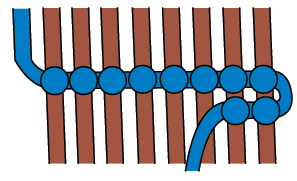
Use the same thread but change direction and make two left-hand knots. When you get to the third knot from the right, the A pattern tells us it shall be a brown knot there instead of blue. Just take the brown thread in question and make a righthand knot "on top of" the blue one.
Step 4
In this way you can choose color of the next knot. Follow the pattern in step 1 until row 2 is finished.
Step 5
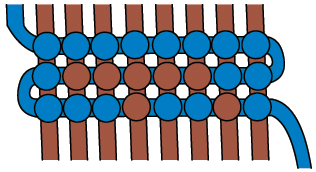
Change direction again and make row 3. Tie right-hand knots to make blue knots and left-hand knots to make brown ones. Follow the pattern.
Step 6
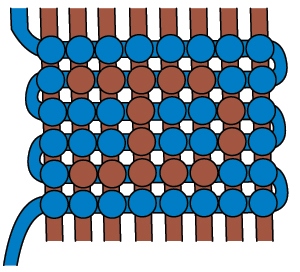
When you've finished the first letter, you can continue with the next. You find suggestions for letters below.
Example alphabet letters
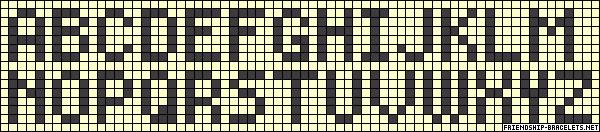
Use the alphabet letters above and combine them into a full bracelet saying your name. It can be a good idea to draw your pattern on a square grid paper first.
Editors
The original author of this tutorial is Stefan .
Comments