(( Bracelets )) Bubble Bracelet
How to Make A Bubble Bracelet
***DISCLAIMER*** ~ I did not invent this bracelet, I saw a picture of it and figured out how to make it on my own. If I knew who did make it, I would list their name; but again, I didn't invent this, just the tutorial.
This is my first tutorial, so if anyone sees anything wrong with it, feel free to edit the problem :)
To make this bracelet, you'll need to know how to do these:
FW KNOT
BW KNOT
CHEVRON/ARROWHEAD
CHINESE STAIRCASE
Getting Started
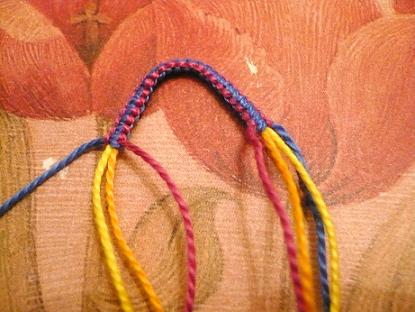
To start, you will need 8 strings: 2 strings of 4 colors. I'll be referring to them as colors A (blue), B (yellow), C (gold), and D (pink). I used one 6-foot-long strand of each color, then folded them in half.
Set up: ABCDDCBA (I set mine up by making the first half of a buckle.)
STEP 1
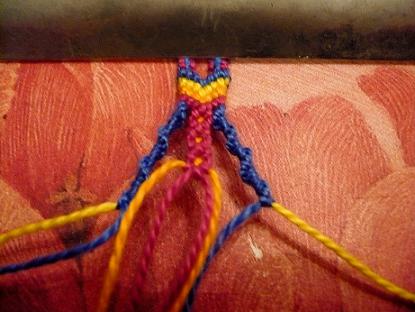
Make 4 Chevron/Arrowhead rows, 1 of each color, in alphabetical order (starting with A and ending with D.)
STEP 2
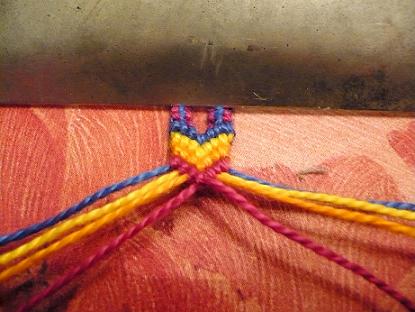
Now we're going to make the middle section. Set aside all A (blue) and B (yellow) strings. Now take the the D (pink) string on the left and make a bw knot on the C (gold) string next to it. Repeat this on the other side, making a fw knot with the D string over the other C one.
STEP 3
Make a fw (or bw) knot between the two C strings.
STEP 4
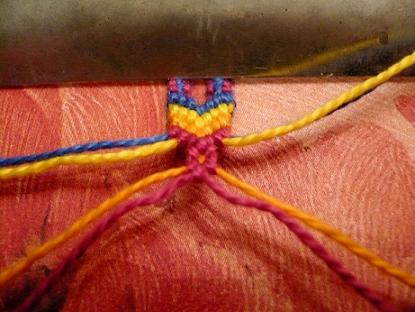
Now take the D string on the left and make a fw knot over the C string next to it. Repeat on the other side, but make a bw knot with the C string over the D string instead of a fw knot.
STEP 5
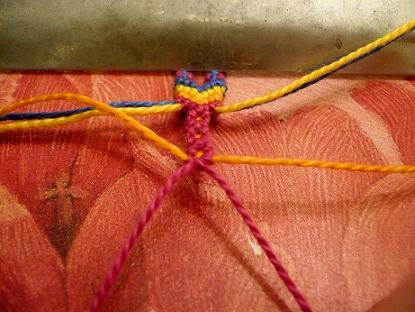
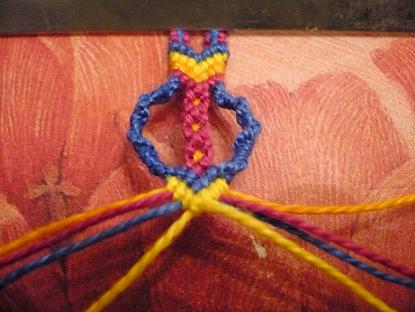
Repeat steps 2 - 4 two more times. (There should be three dots made of color C.)
STEP 6
Now take the A (blue) and B (yellow) strands on one side. Using the A strand, make about 25 Chinese staircase knots over the B string, or until the Chinese staircase section is about 1/3 longer than the middle section.
STEP 7
Using the A and B strings on the other side, repeat step 6.
STEP 8
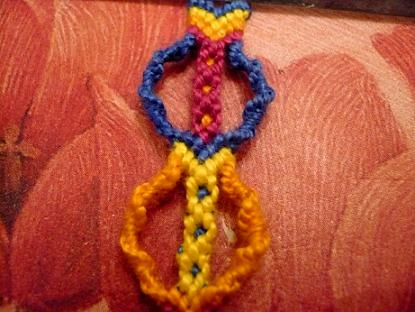
Using the A string on the left, make fw knots across the C and D strings next to it. Repeat on the right side, using bw instead of fw knots. Knot both the A strings together.
STEP 9
Using the B strings, create 1 Chevron/Arrowhead row. Strings should be set up like this: CDABBADC
To continue the bracelet, repeat steps 2 - 9 for each "bubble" section. But on the next section, the colors will be all switched around. On the even-numbered sections (and by "even-numbered," I mean the 2nd, 4th, etc. times you repeat steps 2 - 9), what was D will know be B, what was B will now be D, what was A will now be C, and what was C will now be A. It sounds reall confusing, but it really isn't, as long as you pay attention to how the strings are set up. The colors go back to how they were originally set up on each odd-numbered repeat of steps 2 - 9 (i.e. the 1st, 3rd, 5th, etc.)
STEP 10
Make 4 rows of a regular Chevron/Arrowhead pattern. Finish off however you want (in my case, the other half of the buckle.)
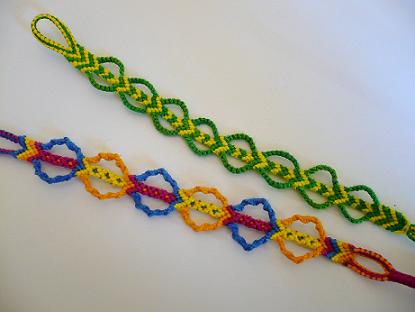
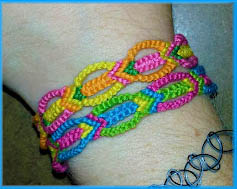
Once you understand how this bracelet is constructed, it's not too hard to tweak it. For the green/yellow one in the picture, I only used 2 colors (obviously), I traded the Chinese staircase knot for fw/bw and bw/fw knots, and I did a Chevron/Arrowhead pattern all the way down the bracelet. I also shortened the length of each section. It would probably be crazy easy to add beads and stuff, so just use your imagination and have fun with it :)
________________________________________________________________
Alternate Version: Bubble Bracelet with Chevrons
by AnneAdeline
________________________________________________________________
Set-up
Choose 4 colors, one of which will be shown less.
Cut each of the 4 colors about 4 to 5 feet long, fold over, and tie in a knot.
In this case, yellow is the color that will be seen less.
Arrange your colors so your least favorite is second and second-to-last.
Imagine the strings have been labeled A1 B1 C1 D1 D2 C2 B2 A2.
**Note: The "1" and "2" denote whether the string is on the left or right. There are times when the two middle strands switch places. Instructions refer to the strings as if 1 is always the left strand and 2 is the right strand.
Step 1
Tie A1 over B1 16 times. I used 8 forward-backward knots, which you can see how to tie here. Alternative: Tie 16 hitches so it looks like a Chinese staircase. For the A2 over B2, you need to tie 8 backward-forward knots. Below is a picture of the first part of a backward-forward knot.
Step 2
Here is the second half of the backward-forward knot.
Step 3
After both A's have been tied over the B's, it should look like the following.
Step 4
With the C1 and C2, tie 5 square knots over the two D strings. Click here for instructions on how to tie a square knot. Below in the first half of the square knot. Make sure to tighten completely.
Step 5
Below is the second half of a square knot. After this is tied, you must tie 4 more complete square knots.
Step 6
Here is the completed chain section. Next, it is time to tie the chevron section.
Step 7
[p]Tie B1 over C1 and D1. Tie B2 over C2 and D2, then over B1. This final knot connects the two B strands. The order of the strings is now ACDBBDCA.
Step 8
Tie A1 over C1, D1, and B1. Then Tie A2 over C2, D2, B2, and A1. Order is now CDBAABDC
Step 9
Final row of the chevron. Tie C1 over D1, B1, and A1. Then tie C2 over D2, B2, A2, and C1. Order after chevron has been tied is DBACCABD.
Step 10
You are now done with one repeat of the pattern! Imagine the strings have been re-named (pink used to be D, but is now A) and repeat steps 1-10. Continue for as long as you want the bracelet to be.[/li]
Below you can see what the completed bracelet looks like.
Tips and Tricks[/h2]
~ Try changing the number of knots for the side chains and middle square knots to lengthen or shorten. By increasing the side chains more than the square knots, you will have a bracelet that is wider.
~ Increase the number of strings for a wider bracelet with more color combinations.
~ Instead of square knots in the center, try twisted square knots.
~ Add beads to customize your bracelet more (and make it faster to complete!).
If you want the Printable PDF of the tutorial, click here! (Link will open on Google Docs.)
Editors
The original author of this tutorial is crazycoltsfan .
Uploaded photos (see all 2)

Comments