How to read patterns
| Table of contents |
|---|
| 1 - Example: tying pattern 36 1.0 - Box 1 1.1 - Box 2 1.2 - Box 3 1 - Videos 1.0 - Video 1 1.1 - Video 2 1.2 - Video 3 1.3 - Video 4 |
Example: tying pattern 36
This explanation and first video is for is pattern 36
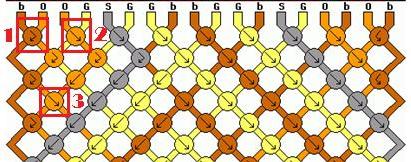
Box 1
In box one, the generator tells us to create a right-left knot with strings 1 and 2 (brown and orange). Create the knot and move those strings out of the way.
Box 2
In box two, the generator tells us to create a forward knot with strings 3 and 4 (orange and yellow). Once you have created that knot, move the strings out of the way.
Next next time, you tie strings 5 and 6, then 7 and 8, 9 and 10, 11 and 12, 13 and 14, 15 and 16, 17 and 18.
Box 3
For box three, you have started a new row. You will knot be tieing the strings on the outside into this row, so it is best to put them out of the way. In this row, strings 2 and 3 are both orange and you will create a forward knot with them. Move them out of the way once you are finished and continue on with strings 4 and 5, and the rest of the way accross the row.
Videos
Video 1
Video 2
Video 3
Video 4
Editors
The original author of this tutorial is spiffehgymnast .
Comments