(( Beginner Tutorial )) Jipijapa
| Table of contents |
|---|
| 1 - Introduction 2 - Materials and Set Up 3 - Step by Step 3.0 - Step 1 3.1 - Step 2 3.2 - Step 3 3.3 - Step 4 3.4 - Step 5 3.5 - Step 6 3.6 - Step 7 3 - Tips |
Introduction
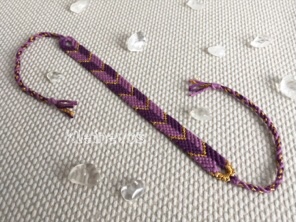
I've had a lot of people asking me how to make this on facebook so I've decided to make a tutorial on how to make this very simple but great looking bracelet.
The jipijapa is basically a chevron.
This bracelet is easy for anyone who is new to making friendship bracelets or advanced.
Materials and Set Up
To start this 10 string design, you will need 3 colours. For this one I've decided to choose purple and gold.
I've used 4 dark purple (A) and 4 lighter purple (B) for the block colours and 2 gold (C) for the arrow shape. The strings need to be about 80 cm (32 inches).
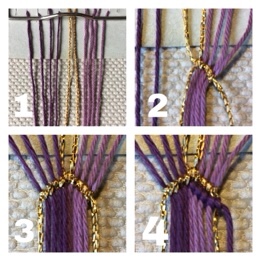
Then when you are ready arrange them as A A A A C C B B B B B like in the photo below, see picture 1.
Step by Step
Step 1
This bracelet starts in the middle. Note that the pattern mentioned above is the other way around: Starting on the outsides. The end result will be the same though! It's only knotted 'upside down'.
Picture 2: Take both your C strings and make a forward knot in the center, then continue with the forward knots over the B strings until you have something like in picture 2.
Step 2
Then with the C string in the middle you want to do backward knots over the A's and create your gold arrow shape like in picture 3.
Your string order should now be C A A A A B B B B C
Step 3
Then starting from the middle again you will be doing the same thing , first with the A over the B like in picture 4.

Step 4
Then with the first lighter purple (B) in the middle you want to do backward knots over the darker purple. See picture 5.
Step 5
Continue doing this. All knots in the middle are always forward knots.
Step 6
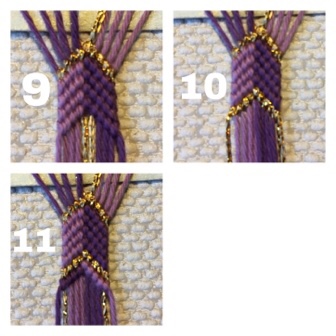
You want to continue doing the same until you get the gold back in the middle. See picture 9.
The A and B strings have switched places. The string order should now be B B B B C C A A A A
Step 7
Repeat the steps above (Read A as B and B as A though!) till you have the length you need.
The darker and the lighter purple will alternate all through the pattern and then you'll finish with something looking like this. :)

I promise that the colors will alternate throughout the pattern. Even though it may not look like they will, trust me, they will! This was the first pattern I ever learned to make and I still enjoy it today, I hope you do too!
Tips
You can also do this the normal way, like the original Chevron. You can also do this with as many strings as you want! Its a great and easy and FUN friendship bracelet!
Editors
The original author of this tutorial is Acid .
Moderator comments Show comments