Star/Snowflake-Tutorial
Many of you have asked me how to knot the star/snowflake-thing I made and so I just decided to give it a try and make my first (non german) tutorial here.I think this one is not for beginners, maybe you should be a bit more experienced...
I'm not good at writing tutorials and English ist not my mother tongue...I'm sorry, but maybe this is at least a little bit useful...
1.
First take a look at this tutorial and read it carefully -
(it declares some basics you may need to understand my tutorial):
http://friendshipbracelets.superforums.org/viewtopic.php?f=18&t=2405&sid=b0c91997bd206055b7b1de3a4e733471&start=0
2.
Now we do the very same thing with 6 instead of 4 bundles of strings...
Strings for the 6 bundles:
each:
2 x lime
2 x olive
2 x white
2 x grey
2 x darkviolet
2 x conflowerblue
2 x blue
3.
I started the same way you can find in the cross tutorial, but I began with 6 bundles of strings instead of 4, so the base of my object becomes a hexagon:

instead of a square:

But you fix the strings or bundles together the very same way.
You start with a little ring of 12 knots and add colour by colour like in the cross tutorial.
Then, when every pair of strings of each of the 6 bundles is used, the star in the middle is ready:
4.
Then you start tying 6 normal bracelets like here
(you don't have to make the same pattern I did, you can also choose an easier arrow pattern like this: https://www.friendship-bracelets.net/pattern.php?id=2 ... this one would be similar to the one I used: https://www.friendship-bracelets.net/pattern.php?id=218)

5.
When they are long enough (about 10 rows each would be okay, I think) you can separate the strings in two bundles and knot some corners (here in an easy candy striped way - one in the left, one in the right direction: https://www.friendship-bracelets.net/pattern.php?id=6858)
Do this with everyone of the 6 star "rays"...so that you have 12 smaller bracelets (with about 9 rows each) forming angles at the end of the 6 straight bracelets. Tie till the smaller ones meet in the middle of the rays.
6.
Then you can fix them together like this:

(you can use the arrow pattern again and unify the striped "rays" like in the picture).
You have to do it 6 times, then your star or snowflake is ready:
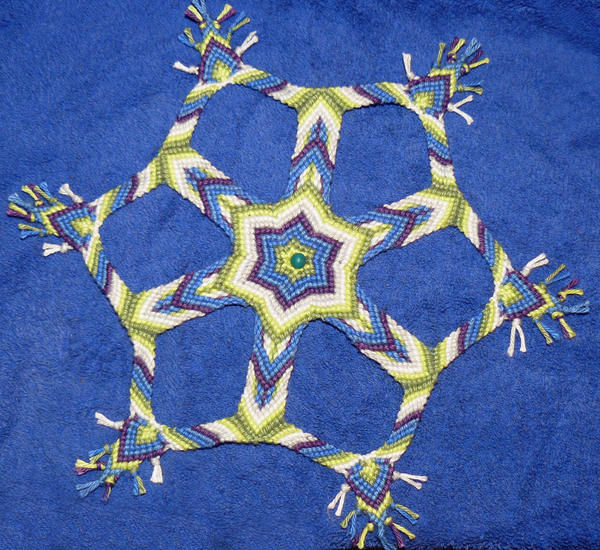
I hope this was useful and at least a bit understandable!
Editors
The original author of this tutorial is Nimue .
Moderator comments Show comments